Showing posts with label crafty. Show all posts

Monday, August 1, 2011

Pinterest Challenge July 2011 | Project Results


The above photo was the inspiration for my project.  It originated from Addicted 2 Decorating.  I repinned someone elses pin, from a blog feature on Classy Clutter. Wow, you could totally play "seven degrees of Pinterest".  Back to the challenge...

 The week before the challenge was issued I had begun a little dining room makeover and was contemplating repainting this cabinet.


The room was getting a new coat of paint and going from Valspar City Storm to Benjamin Moore's Gray Owl.  You can see the City Storm color in the above shot and will see Gray Owl in the room in photos below.  I began to think about the turquoise piano I pinned 6 weeks ago and a lightbulb went off that I did not have to have a piano to recreate the look but could do it with my red cabinet.  I was not sure exactly what color was used on the piano so in the end I custom blended my own turquoise color. 


After I got the color just right, I painted the outside the teal/turquoise and the inside black.  I then worked on the back panel that I did a faux bois treatment on.  Get more detailed information about how I custom mixed the color, what colors I used and how I did the faux bois here.


While waiting for the paint to dry I began to work on the plate part.  First I laid out the plates to get an idea of what I wanted. For more detailed information about the hanging plate part, click here.


After getting the layout right, which took a few days of moving, photographing and lots of head tilting, I moved on.  I then rolled out craft paper and laid the plates down again and traced around the outside to make a pattern of sorts.


I planned to hang up the pattern above the cabinet to make sure that I liked the placement.


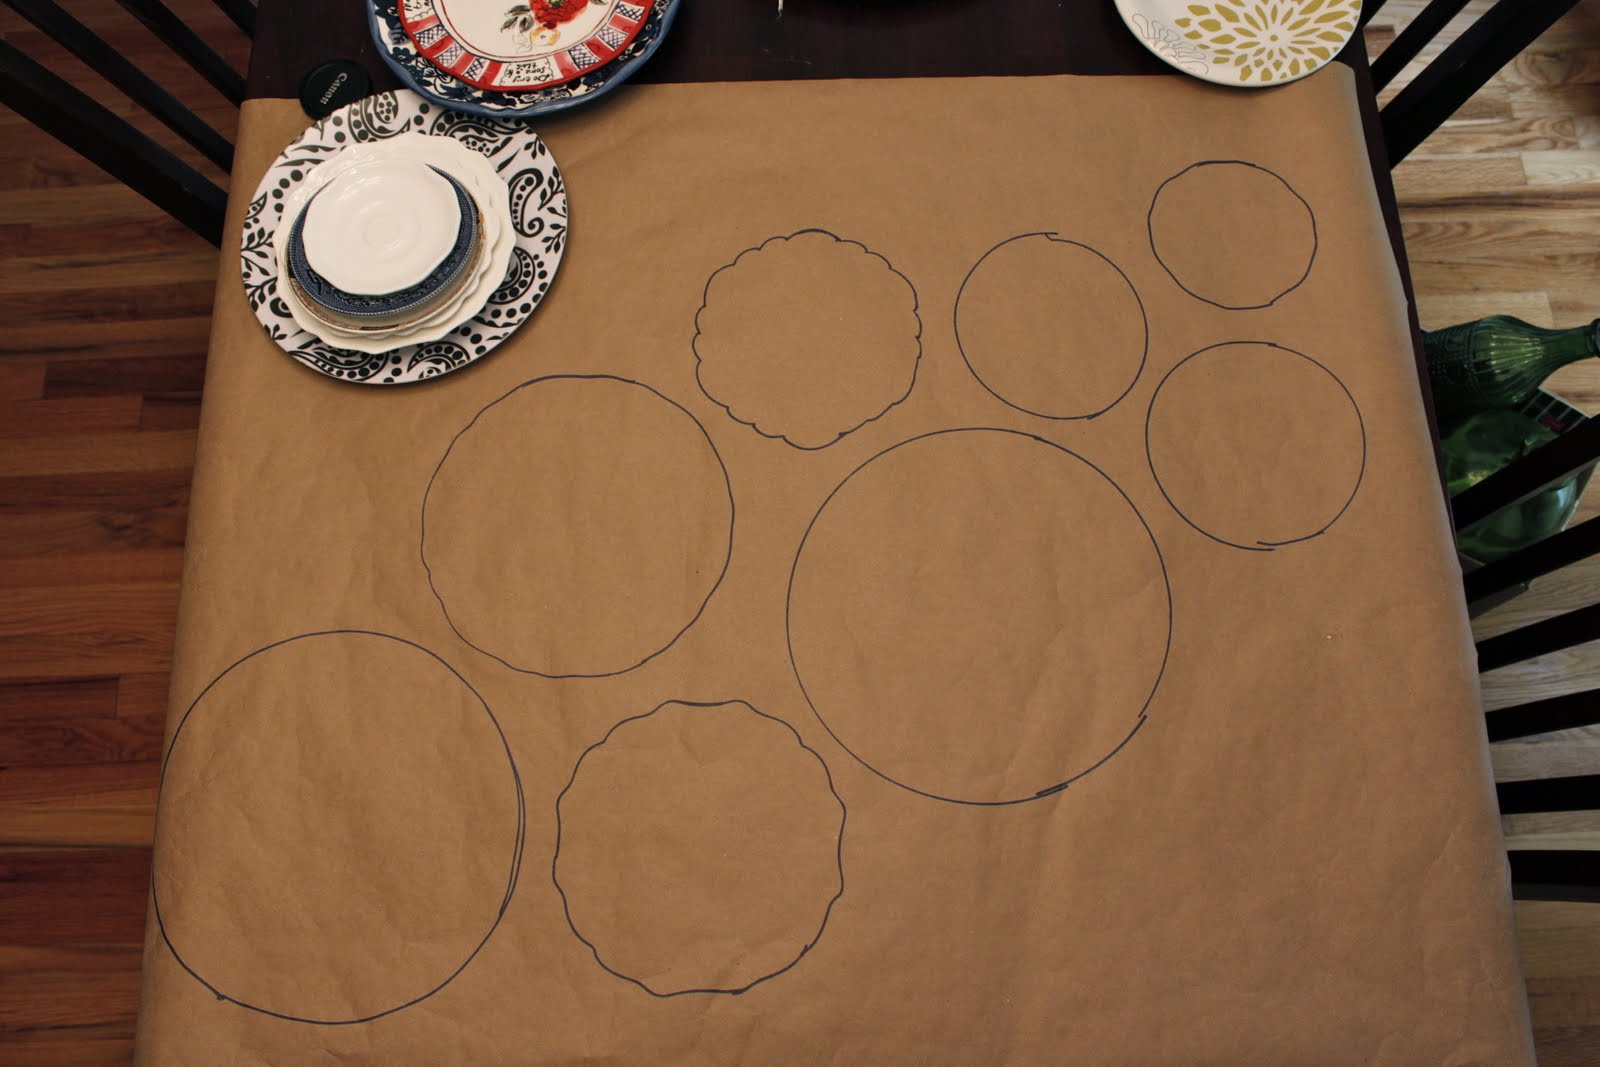
This is probably the third pattern I made.  I lived with it for a day taped to the wall above the cabinet before I began hanging plates.  I am so glad I did this step because they really looked different on the wall.  I used much bigger plates that the inspiration photo which is good and bad.


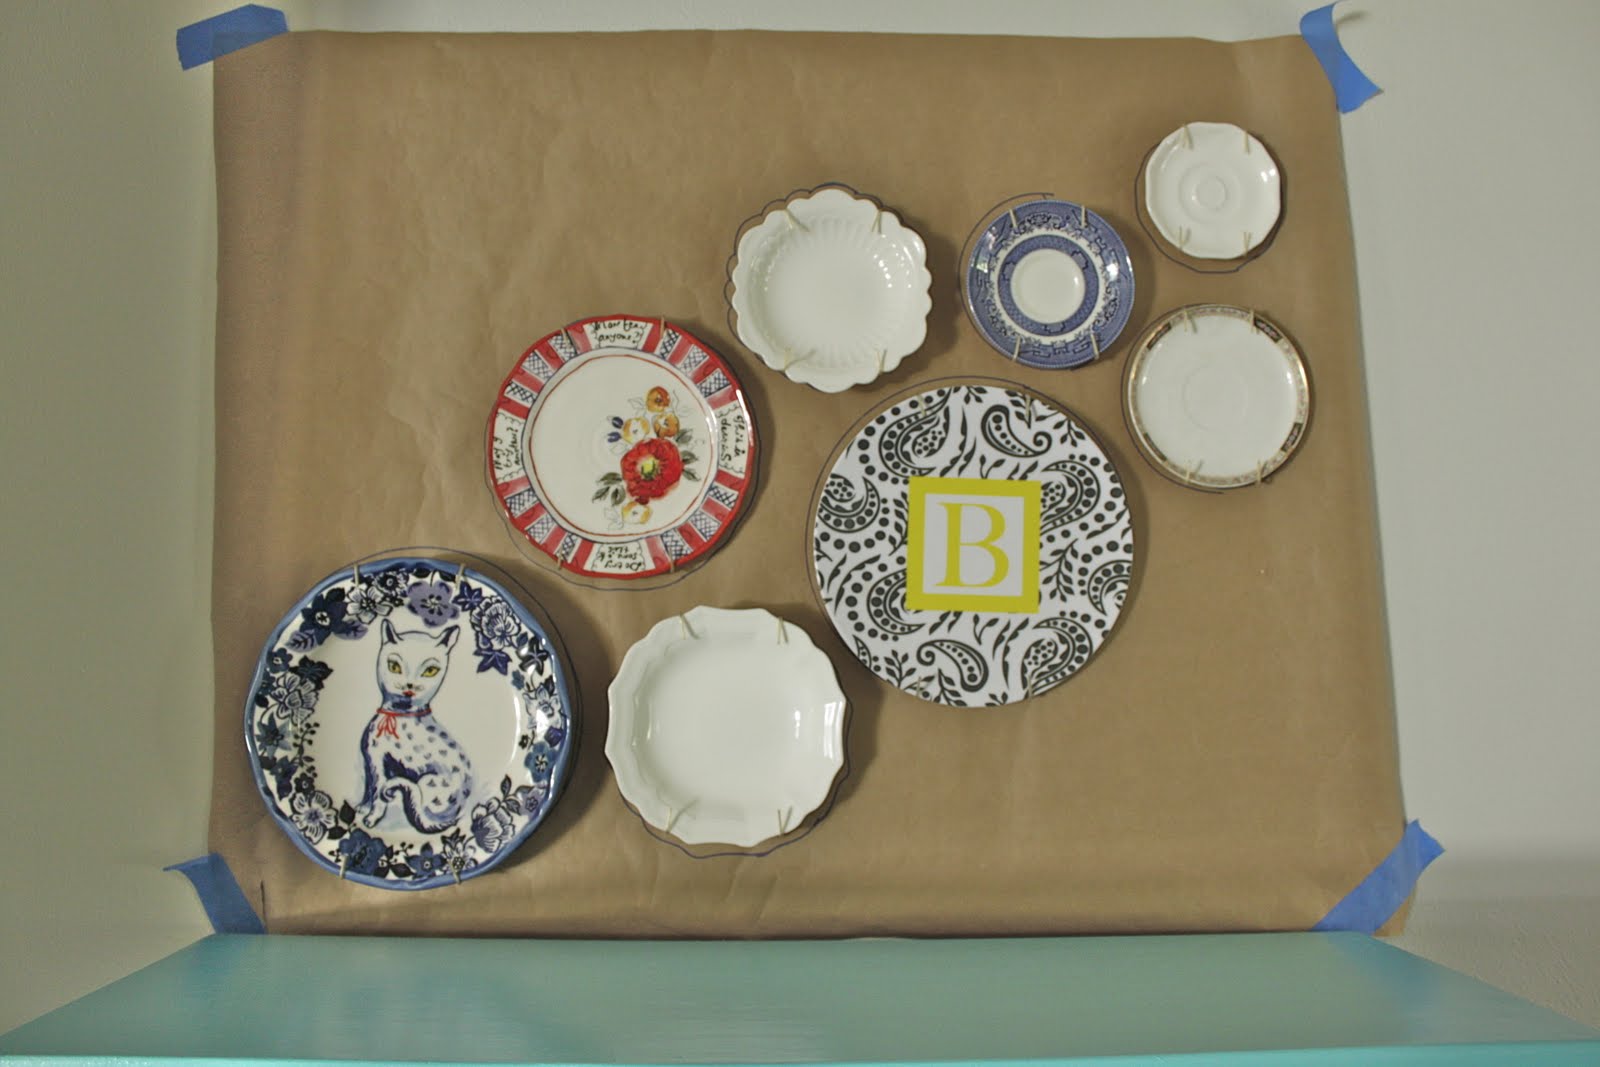
Next came plate hanging hooks {came with the plate hangers}.  The whole plate hanger part of this is a whole other issue/story for another time. If you want to know more about it, click here for details. Anyway, I hung the hooks and then placed the plates up.


Then it was time for the paper to come down!


Back up the plates went!


I had been playing with different accessories for the top of the cabinet and decided to go with these CB2 vase/candle holders I have had for several years.  I also have white Zgallerie pillar candle sticks that look good that could be a future option.  I liked the lighter visual weight that the glass has since the plates are big.


Since living plants cannot survive in my home due to two furry inhabitants I just cut a few herbs and plants from the yard.


Please ignore the crazy long plate hangers!  I am going to replace/snip them down.  I really wanted to get the project done, so this had to do for the time being. For more information about the plate hangers I used, click here.


Now for a side by side comparison from the inspiration and my completed project!

There are a few changes I plan to make such as changing/modifying the plate hangers as I have already mentioned; adding or swapping plates; changing the wicker vase next to the cabinet; and maybe different knobs on the cabinet.  I love the end result!

Wednesday, July 27, 2011

Pinterest Summer Challenge!

I am so excited about this challenge!  I have the perfect idea for a dining room project obviously inspired by Pinterest.  It is probably my most loved pin.  ever.  So excited!!!

Not sure what I am talking about?  Check out YoungHouseLove, Emily Henderson, BowerPowerBlog, or Making a House a Home.

Thursday, June 30, 2011

Wedding Details {Black and White Wedding}


{all above images from ClaryPhoto see our wedding blog post here}

We just celebrated our second anniversary so I thought I would finally post some of my favorite detail shots from the wedding!  Many of the items in these photos are projects that I DIY'd such as ring bearer pillows, pinwheels, candy bar ribbons for jars, damask cardbox, and photobooth tickets.  Several of the other projects I created and had printed elsewhere were the "sugar bar" window cling, drink stir sticks, "B" cake topper, and dinner menus.

Then we had several fabulous vendors that made other items happen such as Slice of Lime Design for all of our paper goods and Exclusive Events, Inc. for our reception lighting, paper lanterns, white lounge area and decals on the columns.  I especially love our programs from Slice of Lime Design.  They are tiered and have the custom damask design flowing from one page to the next...does that sound right?  I do not know about how it sounds but it turned out fantastic! Slice of Lime Design also created our reception cards that included a poem that I wrote and probably had help from Emily from Slice of Lime Design...it's been so long I cannot even remember!  Anyway, the poem was about the candy bar, the photo booth, and the late night snack that we were serving at 10:00pm.  I will look for a photo that shows it better for another post.

A few other details were each of the bridesmaids bouquets were wrapped with a different black and white ribbon and had a vintage bow broach.  We had red balloons and paper parasols for photos, and my something blue was turquoise ribbon sewn onto the crinoline of my dress.  I also wore the antique wedding ring in the ring detail shots that belonged to my husband's grandma.  She was unable to attend so I wore the ring so she could be there in spirit.  Hmmmm.....I am trying to think of any other special details...would have probably been a good idea to have posted this 2 years ago! Oh yeah, I made my jewelry {chandelier crystal earrings and bracelet} and also made bracelets out of crystals for the bridesmaids.

Not sure if I have previously posted this, but here was our vendor line up for the day!
Photography: ClaryPhoto-Clary Pfeiffer Photography {blog}
Videography: Archway Media (I still have not selected my music so no video yet...)
Paper Goods: Slice of Lime Design
Florist: RW Designs
Wedding Coordinator: Proposing Dreams
Ceremony: St. Ambrose on the hill
Reception: Windows On Washington {8th floor}
Lighting and Decor: Exclusive Events, Inc.
Extras: Photobooth Stl 
Cake: The Cakery 
Rehearsal Dinner: Spink Pavillion Missouri Botanical Gardens
Transportation: A Perfect Touch
Make-up: Holly Speakes
Wedding Dress: Priscilla of Boston Vineyard Collection, Town and Country Bridal

I think that is it!

Sunday, February 14, 2010

Happy Valentine's Day

It seems everyone sends out holiday or New Year cards their first married year, so I wanted to be different and send out Valentines. Okay, actually I did not have myself organized enough to send out holiday or New Year cards. But, I am actually glad.  I love the red balloons, red photobooth curtain with the bit of red for Valentines day. Perfect for Valentines. Working at the last minute, but not willing to make these Saint Patrick's Day, Easter or first day of spring cards, I had to work quick.  Even quicker I had to get them printed.  I settled on the printing.  Time was limited and I do not know where to get good printing done quickly. Kinko's offered the quickest solution. So to make up for the lack of fancy printing, I created cute wrap around address labels. Our return was wrapped to the back and written vertically.  
It was a fun project, and I am very critical of anything I create.  So while I like them, there is always room for improvement!  Happy Valentines Day 2010!

Wednesday, January 20, 2010

12x12 paper lovelies...

After my last post about Paper-Source I decided to peruse the papers to see about that lovely damask print paper for fun liners and wrapping gifts.  While I was not able to find that paper, I did find many other lovelies that I have not seen before. 

I love the idea of creating inexpensive artwork by framing beautiful paper.  It creates an impact and as I mentioned can be very cheap!  Here are some 12x12 paper lovelies that are....well....just lovely!


I love how affordable a single sheet can be!  Also think about how simple it could be to create your own pattern to frame by using a rubber stamp to repeat your design.

Sunday, July 12, 2009

French Memory Refreshed! DIY in under 30min.

This french memory board needed a makeover. Something a little more special but not too much going on that it takes away from what it may display...

This project cost $0 as I used items that I already had. That is the best kind of makeover! I cannot believe how fast this project went...it will go even faster if you gather all your materials and have the hot glue gun plugged in and ready!

I removed the covered buttons on the top and saw that they were glued on over staples. I then removed the backing and had to reattach the small wooden pieces where some of the staples would hit. I used ATG taped to help it stick.

Black grosgrain ribbon with a white boarder was applied to the front and stapled in place.

I then used buttons that were intended for a winter coat {hello! its summer, who cares about new buttons!} and hot glued them where the ribbons crossed.

The buttons did not have a flat back...which caused them to not lay flat. I like the design on the buttons, so we will give it a whirl. They are glued pretty securely, so they should hold up just fine.
The refreshed french memory board may find a home in the new kitchen! Since the fridge is off limits, it would be great to display invitations and pictures {on a wall...away from the reach of Frankie!}

Kitchen update

I feel that I have gotten so much done in the kitchen. While, I have really only rearranged items that I already own, or received as gifts...my only expense so far remains the can of spray paint.

I have a horrible problem of getting way too excited about a DIY project and not stopping to take a "before" picture...so I am going to have to scour my iphoto library to see if I have any before pics for my corkboard turned chalkboard project...which I diy'd the corkboard 3 years ago. Ah...I love reusing!

Today I spray painted two open back ornate frames...one for the chalk board...the other to display a few detail shots from the wedding {sugar bar or cake?}. I will cut the mat for that frame so I will just need the glass cut. I may even have some in another frame??? Good thing about having so much framed art collecting dust.

I am also going to search to see if I have a before of the kitchen...before I accessorized. Cause honestly, it is looking so much better already...that I cannot wait to see it finished.

Tomorrow I am going to get some fabric for my valance. I also have the idea of using a table cloth that I planned on using for the wedding at our sugar bar, but did not. That would also help me with the budget! I am not committed to using the table cloth yet. I am going to 2 fabric stores tomorrow to check out the stock.

Chris and I are going to have a real talk about the cabinets. I am leaning towards painting them now. Or doing a patterned metal insert. These are some inspiration pictures.

Basic cabinets. The color is very similar {if not exact} to ours.
This is an after of the above shot. I like the two different colors of paint and the extras on the white section to create a faux hutch. I also really like the black behind the open upper cabinets. It we do open uppers, then I would love to do the black! Imagine yellow flowers....blue/green walls, cute ceramic birdies....hmmm...ok. I have work to do.
This is patterned steel. Very cool. I think I would like it with a black cabinet....or maybe just on lower cabinets...or maybe not? I am not sure. gah! decisions.
{all images from Better Homes and Gardens}


Saturday, July 11, 2009

kitchen mini makeover

Throw in some tiffany blue and this is the color palette that I want for my kitchen. Problem is my cabinets are honey colored {icky} and the counter tops are just ehh. I am hoping to spruce up the kitchen with a valance, new light fixture over the sink and some DIY projects....were talking like $50 maybe $100, but that would be stretching it.....I think I can do it.

I bought some spray paint {creamy yellow} for a chalkboard project I plan to do this weekend...I also need a really cool piece of art...I would love to have one {black and white} of our sugar bar or our wedding cake...hmmm...

I plan to accessorize the space {have cute little white ceramic bird salt and pepper set}. Ugh. I really just want to paint the cabinets and I feel that the project would really pull together, but doing that seems really labor intensive and frankly I am way to creative to spend my time on that.

I am not sure what type of fabric to get for the valance. I was originally thinking black and white....but decided I needed yellow to add my punch of color against the honey colored cabinets and the pale blue/green wall. We also have black and white tile in the kitchen. I know, so retro. So here is what I am thinking for valance fabric. Black and white patterns are so easy to find...yellow? not so much!
{Picnic Damask Yellow, via Sew, Mama, Sew!}

{Antler Damask Tarragon, via Sew, Mama, Sew!}

{Anna's Drawing Room Sketchbook Ivory}

Link{Dandy Damask}

Since the walls are blue, I want to stay away from blue. I just don't know which direction I want to go! Suggestions?
Related Posts with Thumbnails